Do you use a browser? Don’t answer that, of course you do. And if you don’t hate the internet and all life on this planet, chances are you are NOT using Internet Explorer. If you are using Firefox or Chrome, I highly recommend using HTTPS Everywhere written by the Electronic Frontier Foundation. This will cause your browser to force SSL traffic on sites that support it. Keep in mind not all sites support SSL. Also, I am unsure how this works agains such MITM attacks as sslstrip.
HTTPS Everywhere for a More Secure Browsing Experience
Posted by Rose Bush on November 20th, 2012
The error that the other server returned was: 550 550 Mailbox unavailable or access denied – (state 13).
Posted by Rose Bush on November 20th, 2012
The error that the other server returned was: 550 550 Mailbox unavailable or access denied – <example@comcast.com> (state 13).
I was sending an old contact an email, and got this in my bounceback, and NO, the email address in my example is not the email address I was sending to. The fix was simple enough, I had to change the address to the .net TLD and was then able to resend the message.
Restore of database ‘NEWDB’ failed. (Microsoft.SqlServer.Management.RelationalEngineTasks) ADDITIONAL INFORMATION: System.Data.SqlClient.SqlError: BACKUP LOG cannot be performed because there is no current database backup. (Microsoft.SqlServer.SmoExtended)
Posted by Rose Bush on November 20th, 2012
Restore of database ‘NEWDB’ failed. (Microsoft.SqlServer.Management.RelationalEngineTasks) ADDITIONAL INFORMATION: System.Data.SqlClient.SqlError: BACKUP LOG cannot be performed because there is no current database backup. (Microsoft.SqlServer.SmoExtended) For help, click: http://go.microsoft.com/fwlink?ProdName=Microsoft+SQL+Server&ProdVer=11.0.2100.60+((SQL11_RTM).120210-1917+)&LinkId=20476
Lets take a look in the SQL Server error log, to do so:
In Object Explorer, expand a server, expand Management, and then expand SQL Server Logs.
Right-click a log and click View SQL Server Log.
The errors (combined below for readability) generated for this is not much more helpful.
Date 11/20/2012 11:56:40 AM
Log SQL Server (Current – 11/20/2012 12:03:00 AM)
Source Backup
Message
Error: 3041, Severity: 16, State: 1.
BACKUP failed to complete the command BACKUP LOG NEWDB. Check the backup application log for detailed messages.
As it turns out, I also had the warning of ‘A tail-log backup of the source database will be taken. View this setting on the Options page.’ This was also a just created database. When I unchecked the box for ‘Take tail-log backup before restore’ under the ‘Tail-Log backup’ section I was then able to run my restore and get past this error. This is the first time I have run into this error, I am unsure if this is a change with SQL 2012.
Migrating SQL Server Users
Posted by Rose Bush on November 20th, 2012
Are you migrating SQL users? I recommend migrating their SID’s as well. There is this article on MSDN. The sum of it is to run this:
|
1 2 3 4 5 6 7 8 9 10 11 12 13 14 15 16 17 18 19 20 21 22 23 24 25 26 27 28 29 30 31 32 33 34 35 36 37 38 39 40 41 42 43 44 45 46 47 48 49 50 51 52 53 54 55 56 57 58 59 60 61 62 63 64 65 66 67 68 69 70 71 72 73 74 75 76 77 78 79 80 81 82 83 84 85 86 87 88 89 90 91 92 93 94 95 96 97 98 99 100 101 102 103 104 105 106 107 108 109 110 111 112 113 114 115 116 117 118 119 120 121 122 123 124 125 126 127 128 129 130 131 132 133 134 |
USE master GO IF OBJECT_ID ('sp_hexadecimal') IS NOT NULL DROP PROCEDURE sp_hexadecimal GO CREATE PROCEDURE sp_hexadecimal @binvalue varbinary(256), @hexvalue varchar (514) OUTPUT AS DECLARE @charvalue varchar (514) DECLARE @i int DECLARE @length int DECLARE @hexstring char(16) SELECT @charvalue = '0x' SELECT @i = 1 SELECT @length = DATALENGTH (@binvalue) SELECT @hexstring = '0123456789ABCDEF' WHILE (@i <= @length) BEGIN DECLARE @tempint int DECLARE @firstint int DECLARE @secondint int SELECT @tempint = CONVERT(int, SUBSTRING(@binvalue,@i,1)) SELECT @firstint = FLOOR(@tempint/16) SELECT @secondint = @tempint - (@firstint*16) SELECT @charvalue = @charvalue + SUBSTRING(@hexstring, @firstint+1, 1) + SUBSTRING(@hexstring, @secondint+1, 1) SELECT @i = @i + 1 END SELECT @hexvalue = @charvalue GO IF OBJECT_ID ('sp_help_revlogin') IS NOT NULL DROP PROCEDURE sp_help_revlogin GO CREATE PROCEDURE sp_help_revlogin @login_name sysname = NULL AS DECLARE @name sysname DECLARE @type varchar (1) DECLARE @hasaccess int DECLARE @denylogin int DECLARE @is_disabled int DECLARE @PWD_varbinary varbinary (256) DECLARE @PWD_string varchar (514) DECLARE @SID_varbinary varbinary (85) DECLARE @SID_string varchar (514) DECLARE @tmpstr varchar (1024) DECLARE @is_policy_checked varchar (3) DECLARE @is_expiration_checked varchar (3) DECLARE @defaultdb sysname IF (@login_name IS NULL) DECLARE login_curs CURSOR FOR SELECT p.sid, p.name, p.type, p.is_disabled, p.default_database_name, l.hasaccess, l.denylogin FROM sys.server_principals p LEFT JOIN sys.syslogins l ON ( l.name = p.name ) WHERE p.type IN ( 'S', 'G', 'U' ) AND p.name <> 'sa' ELSE DECLARE login_curs CURSOR FOR SELECT p.sid, p.name, p.type, p.is_disabled, p.default_database_name, l.hasaccess, l.denylogin FROM sys.server_principals p LEFT JOIN sys.syslogins l ON ( l.name = p.name ) WHERE p.type IN ( 'S', 'G', 'U' ) AND p.name = @login_name OPEN login_curs FETCH NEXT FROM login_curs INTO @SID_varbinary, @name, @type, @is_disabled, @defaultdb, @hasaccess, @denylogin IF (@@fetch_status = -1) BEGIN PRINT 'No login(s) found.' CLOSE login_curs DEALLOCATE login_curs RETURN -1 END SET @tmpstr = '/* sp_help_revlogin script ' PRINT @tmpstr SET @tmpstr = '** Generated ' + CONVERT (varchar, GETDATE()) + ' on ' + @@SERVERNAME + ' */' PRINT @tmpstr PRINT '' WHILE (@@fetch_status <> -1) BEGIN IF (@@fetch_status <> -2) BEGIN PRINT '' SET @tmpstr = '-- Login: ' + @name PRINT @tmpstr IF (@type IN ( 'G', 'U')) BEGIN -- NT authenticated account/group SET @tmpstr = 'CREATE LOGIN ' + QUOTENAME( @name ) + ' FROM WINDOWS WITH DEFAULT_DATABASE = [' + @defaultdb + ']' END ELSE BEGIN -- SQL Server authentication -- obtain password and sid SET @PWD_varbinary = CAST( LOGINPROPERTY( @name, 'PasswordHash' ) AS varbinary (256) ) EXEC sp_hexadecimal @PWD_varbinary, @PWD_string OUT EXEC sp_hexadecimal @SID_varbinary,@SID_string OUT -- obtain password policy state SELECT @is_policy_checked = CASE is_policy_checked WHEN 1 THEN 'ON' WHEN 0 THEN 'OFF' ELSE NULL END FROM sys.sql_logins WHERE name = @name SELECT @is_expiration_checked = CASE is_expiration_checked WHEN 1 THEN 'ON' WHEN 0 THEN 'OFF' ELSE NULL END FROM sys.sql_logins WHERE name = @name SET @tmpstr = 'CREATE LOGIN ' + QUOTENAME( @name ) + ' WITH PASSWORD = ' + @PWD_string + ' HASHED, SID = ' + @SID_string + ', DEFAULT_DATABASE = [' + @defaultdb + ']' IF ( @is_policy_checked IS NOT NULL ) BEGIN SET @tmpstr = @tmpstr + ', CHECK_POLICY = ' + @is_policy_checked END IF ( @is_expiration_checked IS NOT NULL ) BEGIN SET @tmpstr = @tmpstr + ', CHECK_EXPIRATION = ' + @is_expiration_checked END END IF (@denylogin = 1) BEGIN -- login is denied access SET @tmpstr = @tmpstr + '; DENY CONNECT SQL TO ' + QUOTENAME( @name ) END ELSE IF (@hasaccess = 0) BEGIN -- login exists but does not have access SET @tmpstr = @tmpstr + '; REVOKE CONNECT SQL TO ' + QUOTENAME( @name ) END IF (@is_disabled = 1) BEGIN -- login is disabled SET @tmpstr = @tmpstr + '; ALTER LOGIN ' + QUOTENAME( @name ) + ' DISABLE' END PRINT @tmpstr END FETCH NEXT FROM login_curs INTO @SID_varbinary, @name, @type, @is_disabled, @defaultdb, @hasaccess, @denylogin END CLOSE login_curs DEALLOCATE login_curs RETURN 0 GO |
This awesome stored procedure is created, you can then run it as so:
|
1 |
EXEC sp_help_revlogin |
The output is what would be needed to create the users, and their associated SID’s on a separate instance of SQL server. See http://support.microsoft.com/kb/918992
You can also pull the details from a single database, for example:
|
1 |
select name, sid from syslogins where password is not null and name != 'sa' |
You can then use this output to manually recreate the logins:
|
1 |
exec sp_addlogin @loginame='user', @passwd='password', @sid=sid |
I personally see this as useful when I do not have access to the source installation to run the first set of scripts, and am only supplied a backup.
php Warning: Cannot modify header information
Posted by Rose Bush on November 20th, 2012
I received the error of “php Warning: Cannot modify header information”, and found the fix is to update my php.ini to include this:
|
1 |
output_buffering = On |
I ‘could’ also set the variable in an include page, if my site was running PHP as a CGI.
Forcing IP Resolution of a Domain for Local Testing Purposes
Posted by Rose Bush on November 15th, 2012
If you need to test a server using a domain name, but can not repoint the domain to test, you can force your local machine to resolve the domain name to the IP address of your choice. You do this using the hosts file, on Windows, or the resolv.conf file on a linux OS. This is going to be OS specific, find the directions below for your OS.
Windows XP:
COMING SOON!
Windows Vista/7/8:
Start -> All Programs -> Accessories -> Notepad
Right click and run as administrator.
File -> Open
%SystemRoot%\system32\drivers\etc\hosts
You may need to type in the name hosts again.
Here you can edit. The format is rather clear. For each line you have an IP followed by white space, followed by each FQDN you want to resolve to this IP. This list of FQDN’s need to be white space delimited. Save the file. Flush your DNS cache:
|
1 |
ipconfig /flushdns |
If you are testing with a web browser, you may need to take additional steps to circumvent DNS caching within the program.
If you are going to be editing this file often, you can also make a shortcut as so:
Create a shortcut in a folder of your choice.
For the “Type the location of the item” field, put in the following:
C:\Windows\System32\notepad.exe C:\Windows\System32\drivers\etc\hosts
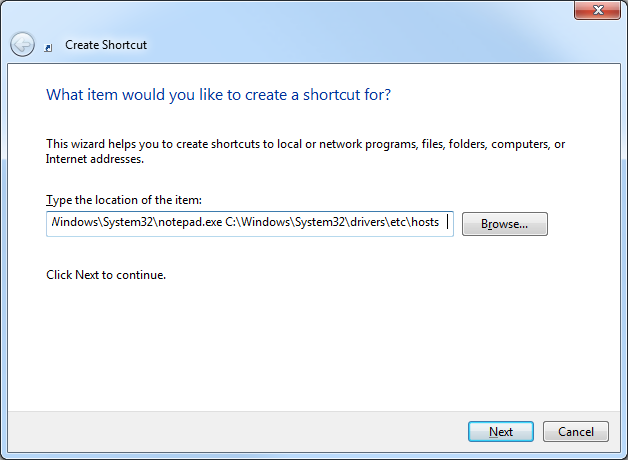
Click Next. On this screen I just title the shortcut ‘hosts’.
Drag this shortcut to your task bar.
Right click on the notepad icon that shows, then right click on the notepad icon in the popup bubble. From there go to Properties.
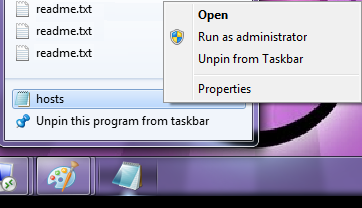
On the Shortcut tab, go to Advanced. Check the box for Run as Administrator.
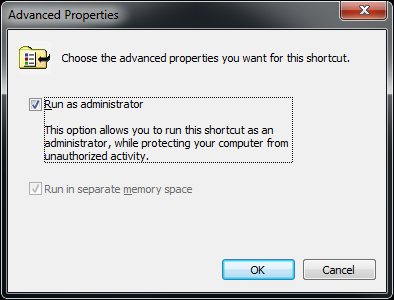
Click OK, Click OK. Now when you click on that link it will prompt you to run Notepad as Administrator and allow you to edit and save the hosts file very easily.
Also, COMING SOON!
Mac OS X 10.0 – 10.1.5:
COMING SOON!
Mac OS X 10.2 and newer:
COMING SOON!
Migrating MySQL Users Between Servers
Posted by Rose Bush on November 13th, 2012
I want a ONE liner to migrating MySQL users between servers. We know that migrating databases is easy enough using mysqldump, but migrating users from one MySQL instance or server to separate one can be annoying. Based on well known export commands, here is a neat little piped set of commands that you can run on the source DB server. The command will generate all the GRANT statements that you can simply run on the destination DB server.
|
1 |
mysql -u <ROOTUSERNAME> -B -N -p<ROOTPASSWORD> -e "SELECT user, host FROM user" mysql | awk '{print "mysql -u <ROOTUSERNAME> -p<ROOTPASSWORD> -B -N -e\"SHOW GRANTS FOR " $1 "@" $2 "\""}' |
If you are logged in as root user and do NOT need to supply user and password:
|
1 |
mysql -B -N -e "SELECT user, host FROM user" mysql | awk '{print "mysql -B -N -e\"SHOW GRANTS FOR " $1 "@" $2 "\""}' |
Hey, lets go two better, lets run the output, and add semicolons at the end of the lines to make the output appropriate to run on the destination server.
|
1 |
mysql -B -N -e "SELECT user, host FROM user" mysql | awk '{system( "mysql -B -N -e\"SHOW GRANTS FOR " $1 "@" $2 "\"")}' | sed 's/$/;/' |
The beauty of this is that you need not know the passwords for any of the mysql user accounts and are then given one block of output, instead of the commands to run to get the grants.
*Migrating all databases except mysql and information_schema:
|
1 |
mysql -u <MYSQLROOTTUSERNAME> -p<MYSQLROOTPWD> -B -N -e"SHOW DATABASES;" | grep -v mysql | grep -v information_schema | xargs mysqldump -u <MYSQLROOTTUSERNAME> -p<MYSQLROOTPWD> --databases > mysqldbdump.sql |
Originaly found on http://jasonbos.co/migrating-mysql-users-from-one-server-to-anot
Spam Email Subjects Than Made Me Laugh
Posted by Rose Bush on November 13th, 2012
Hilarious email subjects found in spam messages!! So, I think this is going to be a post I update from time to time.
If you had a gold fish, you would ask for a bigger instrument.
Big penis:like a:girl!
Your male-pounder won’t fall!
Hoisters for your pork-lever
Three girls? Or 4? It is not a limit for a man with a pack of this male vitamin.
You can get much bigger pecker hustings nerveless
Make your boner so iron in could pierce a hole in ceiling.
Want your babe to moan loud? Take this pilulle and be proud!
Give your rocket more TNT
You’ll call it Peter the Great fortelage overanxiety
Smart approach to arousal problems objurgate riddled
Make your main part bigger gradation wassail
Your woman will like your hose hustings enchantment
Keep your love gun high
Give your action this strength and girls will bend their knees.
She’ll get sweaty when you enter the room because she has tested your amazing organ.
She’ll spread legs if you’ll get bigger
She wants you huge python in her now!
Energize your baby-maker
Say Hi! to your new huge pole
You can’t influence your manhood’s firmness. But we know the thing that can!
Your huge staying device won’t leave any free space in her hole.
Good medical chest for your car
Enjoy the delicious taste of having a monster in your pants.
You got an album with Lady Porn !
**”SHAGGING WILL BE YOUR FAVORITE SUBJECT!”**
You can be ugly and stupid as long as your shaft is big.
COCKZILLA is the word
Setting the To, CC, BCC, Subject & Body Fields Using Mailto: Links
Posted by Rose Bush on November 13th, 2012
I recently came across a scenario where I needed to have a mailto: link include additional details, and particularly an email address in the cc field. You can configure an HTML mailto: link to include a number of fields:
- Basic Mailto: Link
- To:
- CC:
- BCC:
- Subject:
- Body:
The Mailto: Link
The Mailto: Link is a variation of the standard HTML Hyperlink. It invokes the browser to send an email when the ‘href’ attributes value starts with ‘mailto:’ as below.
|
1 |
<a href="mailto:">Email</a> |
To: – Setting the email recipient
The To: field is the only required field of a Mailto: link. This is the email address that the generated email will be sent to.
|
1 |
<a href="mailto:user@example.com">Email</a> |
If you wish to add multiple recipients to the To: field (or the CC: and BCC: fields as shown below) separate the addresses with commas (e.g. admin@example.com,end_user@example.com).
CC: – ‘Carbon Copy’ for adding additional recipients
Note: When adding items to your mailto: link make sure to add a question mark (?) after the ‘To:’ field.
|
1 |
<a href="mailto:user@example.com?cc=other_user@example.com">Email</a> |
BCC: – ‘Blind Carbon Copy’ for adding hidden recipients
You can also add recipients to the email who will be hidden from the To: and CC: recipients within the email message, by using the BCC: field. If you have already added a CC: (or any other element) to your mailto: link, you should include an ampersand (&) before each additional item.
|
1 |
<a href="mailto:user@example.com?cc=other_user@example.com&bcc=admin@example.com">Email</a> |
Subject: – Adding subjects to your emails
The Subject: field in your mailto: link will allow you to set the emails subject.
|
1 |
<a href="mailto:user@example.com?cc=other_user@example.com&bcc=admin@example.com&subject=Test%20Email">Email</a> |
Note: A mailto: link can not contain spaces. When adding a Subject: or Body: field use ‘%20’ instead.
Body: – Making an email template
The final variable of a mailto: link is the Body: attribute. This allows you to set a specific message within the body of the message. You can enter a line such as, “I would like to unsubscribe from this poop.″ with the following:
|
1 |
<a href="mailto:recipient@domain.com?cc=other@domain.com&bcc=hidden@domain.com&subject=Test%20Email&body=I%20would%20like%20to%20unsubscribe%20from%20this%20poop.">Email</a> |
Summary
A fully formed mailto: link can be very useful! Use it, and be more awesome!!
Setting Up SmarterStats 7
Posted by Rose Bush on November 12th, 2012
SmarterStats, and you. I ♥ SmarterStats, from a usability standpoint as well as from an administrator/troubleshooter standpoint. The latest iteration is 7.6.4682, as of this writing. Release notes are found here. After the installation, including the requirement for .NET 4, it will auto open the Getting Started page, likely at http://localhost:9999/GettingStarted.htm. It seems that in this version, and possibly prior versions, there is a Getting Started video tour. I am going to chose to Begin Setup. The screen we are welcomed with is the License Setup Screen. If you have a license, go ahead and put it in now. If not, that is fine. A license can be added into the system after the setup is complete.

In my example, I am deciding to run SmarterStats as the free edition. After clicking Next, the Create System Administrator screen is shown:

As you can see the password does have some requirements.
- Cannot be left empty
- Must be at least 5 characters
- The Confirm Password field must match the New Password field.
This does allow one to use the password of ‘admin’ sans quotes. I recommend against this in a production environment. Making our way to the Next screen, we have the Default System Settings:

The SmarterLogs Path shown is the default, and quite honestly my preference. This path is important when troubleshooting issues to a specific site. The Time Zone setting seems to load based on the local time, and can be changed later on. I believe we also get the option to set this different per site. Our final screen is the Default SMTP Settings screen. Here you can configure how SmarterStats sends email messages. I usually think of this in terms of reports,standard and custom. This can be configured after the setup is complete as well. Once ready click Finish. This article will be updated with links to specific tasks.
Copyright © 2026 Edventures in Normalcy. All rights reserved.